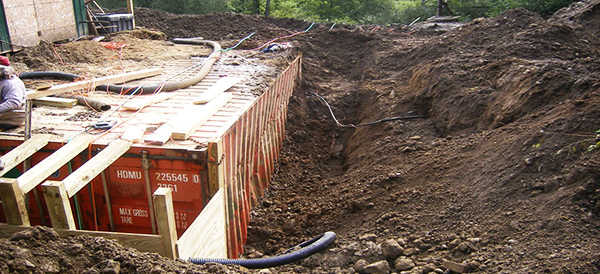
Uncovering the Concept of Burying a Shipping Container
Uncovering the Concept of Burying a Shipping Container
Have you ever considered using a shipping container for more than just storage or transportation? Well, here’s a concept that might surprise you, burying a shipping container! Yes, you read that right. In this step-by-step article, we will explore the fascinating concept of burying a shipping container and why it might be the perfect solution for your unique needs. So, grab a cup of coffee and let’s dive in!
Understand the Benefits of Burying a Shipping Container
Before we dive into the nitty gritty details, it’s essential to understand why burying a shipping container can be advantageous. Firstly, burying a container provides excellent insulation, making it an ideal solution for creating an underground shelter or bunker. It provides protection against extreme weather conditions such as hurricanes, tornadoes, or even wildfires. Additionally, buried containers are hidden from sight, providing enhanced security and privacy.
🔔UNLOCKING THE SECRETS TO FINDING THE BEST STORAGE SHIPPING CONTAINER🔔
Selecting the Right Shipping Container
Now that you’re convinced about the benefits, it’s time to choose the right shipping container for your buried project. When selecting a container, ensure it is structurally sound and in good condition. Opt for a container made of cortex steel, as it is highly resistant to corrosion. Consider the size and dimensions of the container based on your specific requirements. It’s also worth considering purchasing a used container, as they are more cost effective and readily available.
Preparing the Site
Once you have chosen your container, it’s time to prepare the site for burying it. Start by selecting a suitable location. Consider factors such as drainage, accessibility, and proximity to utilities. Clear the area of any debris, rocks, or trees that may obstruct the burial process. It’s also important to check with your local authorities and get any necessary permits or permissions before proceeding.

Excavating the Hole
The next step is to excavate the hole where the container will be buried. The size of the hole should be slightly larger than the dimensions of the container to allow for proper placement. Use heavy machinery such as an excavator or backhoe to dig the hole. Ensure that the hole is deep enough to accommodate the container and provide adequate headspace.
Placing the Container
Once the hole is ready, it’s time to place the container inside. Use a crane or forklift to carefully lower the container into the hole. Make sure it is positioned level and centered within the hole. Use leveling blocks or shims to ensure stability. It’s also a good idea to place a layer of gravel or crushed stone underneath the container to improve drainage.
Backfilling and Securing
After the container is in place, begin backfilling the hole with soil. Gradually fill in the hole, compacting the soil as you go to ensure stability. It’s important to tamp the soil down firmly to prevent any settling or shifting of the container. As you backfill, periodically check the container for levelness and make any necessary adjustments. Once the hole is completely filled, use a compactor or heavy roller to further compact the soil and ensure a solid foundation.
Sealing and Waterproofing
To prevent any water or moisture from seeping into the container, it’s important to seal and waterproof it properly. Apply a layer of waterproof membrane on the exterior of the container, paying extra attention to the joints and seams. You can also add a layer of insulation to further protect against temperature changes. Make sure to seal any openings, such as doors or vents, with weatherproof materials. This will help maintain a dry and secure environment inside the buried container.
Landscaping and Blending with the Surroundings
To make the buried container blend in with its surroundings and minimize its visual impact, consider landscaping around it. Planting shrubs, trees, or other vegetation can help soften the edges and create a more natural appearance. You can also use decorative rocks, gravel, or mulch to cover the exposed areas around the container. Be creative and use your landscaping skills to make the buried container an attractive feature in your outdoor space.
Access and Ventilation
To ensure easy access and proper ventilation inside the buried container, it’s important to plan for these factors during the installation process. Consider installing a hatch or door on top of the container that provides easy entry and exit. Additionally, make sure to install vents or ventilation systems to allow for airflow and prevent condensation or moisture buildup. This will help maintain a comfortable and usable space inside the buried container.
Using the Space
Now that your buried container is in place and properly sealed, it’s time to use the space to its fullest potential. Depending on your needs and preferences, you can use the container as a storage area, a workshop, a wine cellar, or even a cozy guest room. Get creative with the interior design and layout to make the space functional and inviting. Consider adding shelves, cabinets, or other storage solutions to maximize organization. Don’t forget to add lighting, heating, and cooling systems to make the space comfortable year round.
, burying a shipping container can be a great solution for creating extra space on your property. By following these steps and taking the precautions, you can ensure that the installation is safe, secure, and functional. Remember to check with local regulations and obtain any necessary permits before starting the project. With a little planning and effort, you can transform a simple shipping container into a valuable addition to your outdoor space.

